The BluePump can be installed (Click here) in a few hours by two persons up to 100m deep, without the need for a tripod or other special complicated tools. BluePump dealers provide training on-demand as well as a quick update for area pump mechanics that are already familiar with the installation of another type of hand pump, such as Afridev and the India MK2.
The installation procedure is given below. We prefer to publish the installation procedure on this website and not to provide a detailed “standard” manual, simply because we can update the procedure on the website at any time, so you are sure to always have the latest version, and also, we found that most people do not read manuals and learn more from seeing how “it is done” by looking at video’s or through training. Installation training can be provided by our local dealers or we can send trainers from the Netherlands as well.
Watch the video below!!
The BluePump pump system has a piston that moves up and down in a cylinder by moving a handle up and down; the installation procedure is therefore basically the same as similar pumps. However, the BluePump is not a “normal” piston pump; all other piston pumps have components that wear out fast, such as piston seals, bearings & valves, but in the BluePumps, these components have a different innovative design. Therefore the BluePums has no fast-moving spare parts as is the case in all other piston pumps.
The BluePump can be installed in two ways:
1. Standard installation; with PVC pipes hanging on the T-piece flange.
2. Bottom Support installation; with PVC pipes free standing on the bottom.
Click here for the video about installing a BluePump with a Bottom Support System in our BlueZone in Turkana, Northern Keny, using the installation rope to easily let the pipes go down into the deep borehole, here about 95 m. with an installation of the pump cylinder at 65m. deep. The area mechanics that install the pumps are part of the BlueZone maintenance support team, so they know the location and the people that use the pump.
When is a Bottom Support System needed (BSS)?
The riser pipes of the BluePump are made of strong BOODE PVC pipes, glued one into the other, with a male / female connection or with custom-made PVC glue-sockets. PVC pipes are perfect for all types of groundwater, they are relatively light and easy to work with. However, the disadvantage of PVC pipes in a borehole is, that when many PVC pipes are suspended in a borehole, due to the total weight they will stretch up and down during pumping. With time this can cause small cracks and leaks. This would limit the installation depth of the BluePump to about 50m. To overcome this problem, we have developed for installations deeper than 50m the BluePump a “Bottom Support System (BSS). Most BluePumps are installed with the BSS, it’s now a proven technology that makes installation easy and avoids PVC pipes to break.
The “T-piece flange”
Up to 2019, the BluePump came with a specially designed integrated T-Piece with pipe flange that can be used as well for the Hanging Installation (HI) as well as for the Bottom Support (BS) installation.
In the 2019 model, there are now 2 types of flanges for the T-piece; one for the hanging installation (#6) and one for the Bottom Support installation (#54) See the drawings in the section “Spare parts“. In case of a hanging installation, the last (highest) rising main pipe is glued into the T-piece and all pipes are hanging on that T-piece.
While in the case of the Bottom Support installation, the top of the rising main is free-standing in the borehole and cut about 1cm above the concrete platform. Because the rising main is resting on the bottom of the borehole, the pipes can sink a bit in the mud that is often present at the bottom of the borehole. Therefore, the rising main cannot be glued to the T-piece flange and must be free moving inside the borehole. This is made possible with the Bottom Support sleeve pipe (#52) pipe that is glued inside the bottom of the T-piece flange. On the lower part of this PVC sleeve, there is a special water sealing ring inside, that allows the rising main to move a little.
Therefore is very important NOT to glue the top pipe of the rising main to that extension pipe. It is important that the connection between the rising main pipes and the T-piece remains flexible at all times.
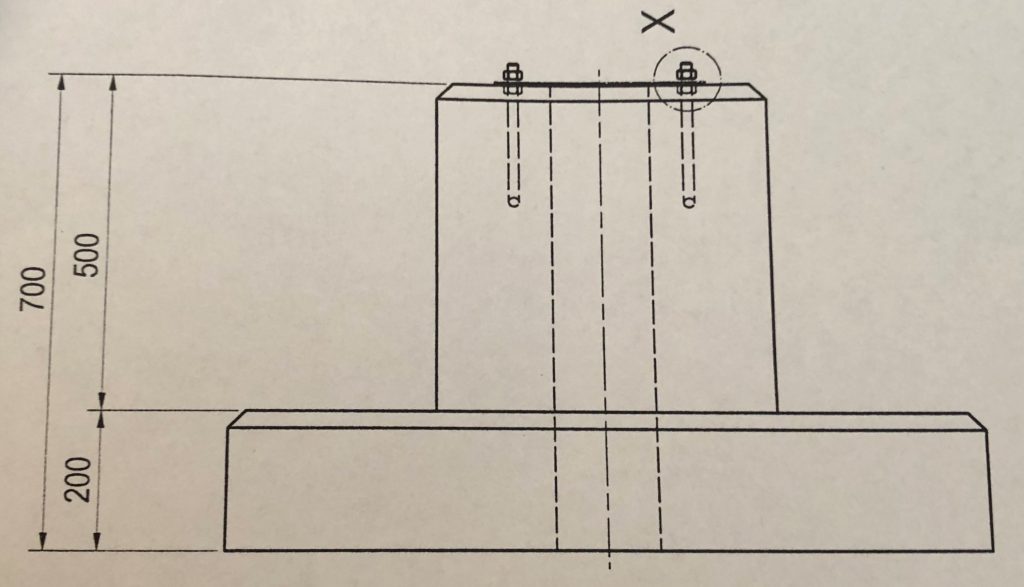
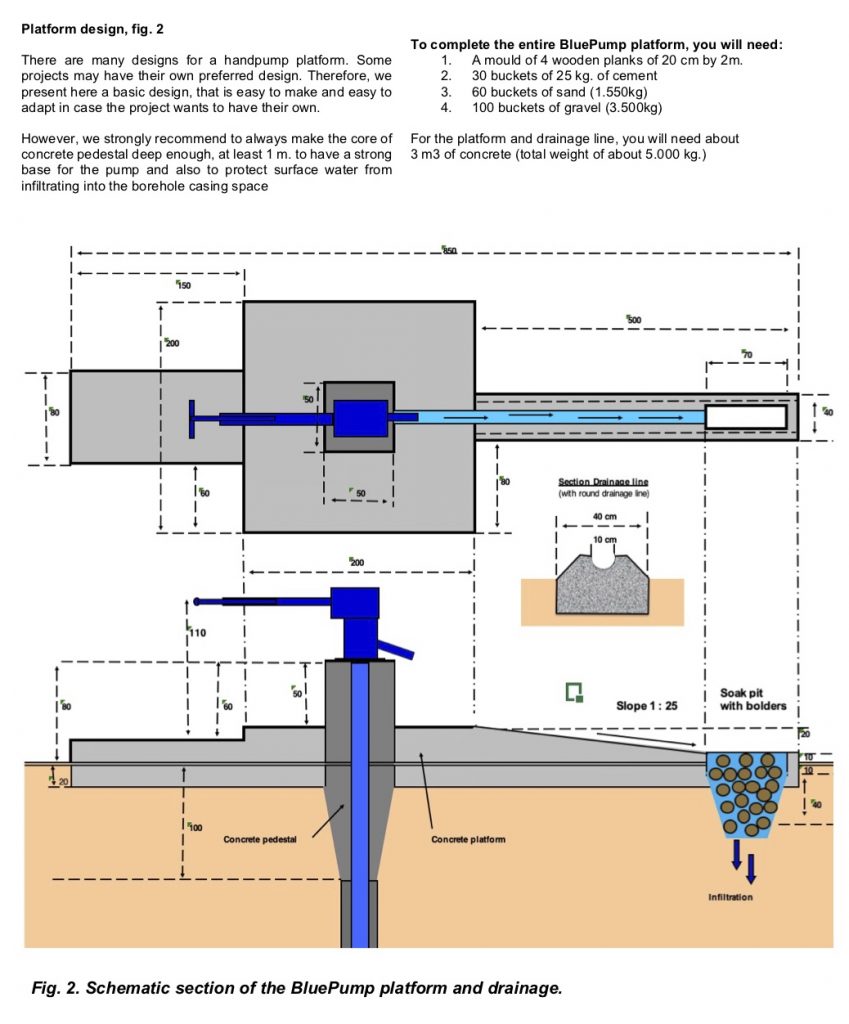
The concrete platform and plinth of the BluePump
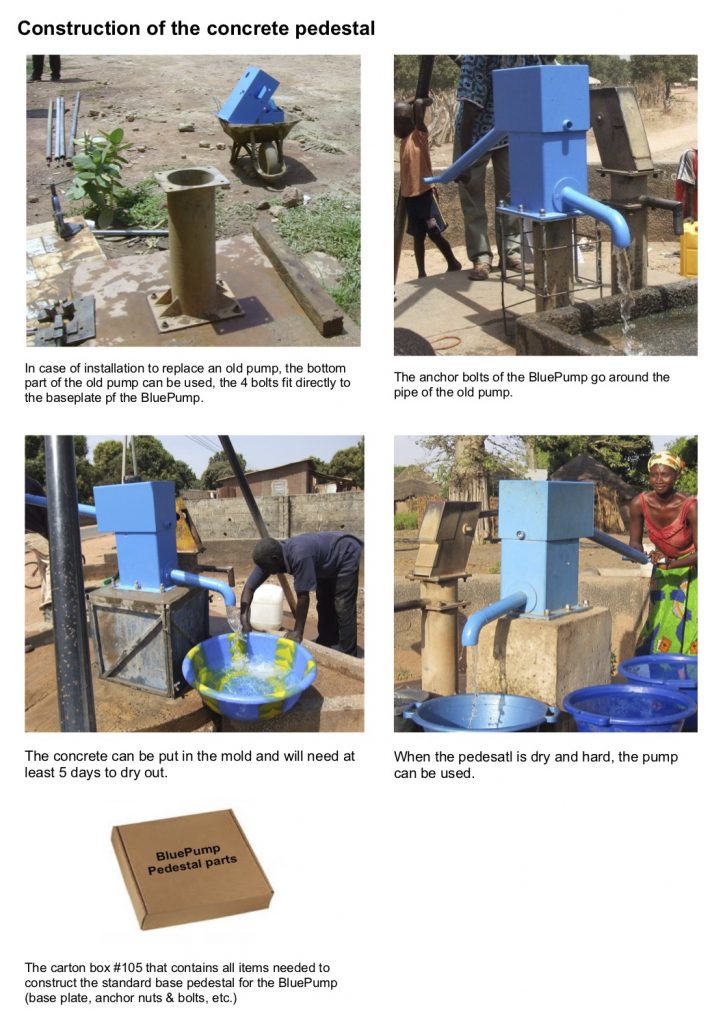
Each installation starts with preparing the concrete platform and plinth. The concrete plinth is a special feature of the BluePump. It provides a very strong and durable base for the pump body and also avoids that surface water will enter in the borehole. The Bluepump comes with a separate carton box that contains all materials needed to prepare the plinth with the anchor bolts, so you are ready to go.
These plinth items come in a separate carton box
The recommended layout for the platform and plinth is given below on this page.
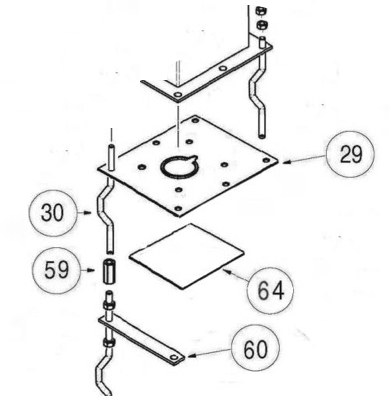
To secure the Blue pump body on the plinth, there are 6 anchor M16 bolts. The 2 anchor bolts at the front, near the spout, are longer and connected with each other to have a good grip in the concrete. These anchor bolts are placed in a vertical position with the help of the base-plate #29. On both sides of the base-plate the anchor bolts are fixed with a M16 nut and the base-plate stays in that position until the concrete is fully dry.
It is very important that the concrete of the plinth is completely dry and hard before the actual pump is installed. Therefore it must dry out at least for 5 days.
New item #64
To avoid that dirt can enter in the borehole, during the time that the concrete hardens, a small plate item #64 is available to cover the borehole and after that, secure that plate with the base-plate.
Preparation before going into the field
Before going into the field with all the materials, we strongly recommend preparing the rods with the blue centralizers in the workplace. You can also already prepare the blue pump body and attach the handle to it. Please note that the M16 handle bolts must be fixed “inside out”, this is to make the important tightening of these bolts easier.
In case of a Bottom Support with glued sockets, we recommend gluing already 1 socket on each PVC pipe before going into the field. This reduces the workload and allows for easy and fast operation.
1. Hanging Pipes installation; cylinder installed at < 50m.
In case of shallow to medium static water tables (less than 40m deep), the installation of the conical seat (#3) the PVC rising mains (#5) are “hanging” at a flange-socket (#6).
The “hanging” installation procedure is as follows:
– fix the base-plate (#29) on the 6 anchor bolts (#29),
– attach the rope (#26) to the bottom of the CSP,
– lower the PVC pipes with the rope,
– glue the T-piece (#6) to the last upper pipe,
– place the pump pedestal (#35) over the T-piece,
– lower the cylinder with the rods (#22) into the riser pipes,
– when the cylinder locks in the conical seat,
– cut the rod at the level of the T-piece,
– fit the handle (#47) and connect the rods to the handle,
– fit the spout (#34) to the T-piece,
– place the cap (#41) and start pumping.
2. Bottom Support Installation >50m.
Bottom Support is needed in case the cylinder is installed below 50m. The advantage of the Bottom Support system is that all of the PVC pipes are resting on the bottom of the borehole, so there is no weight hanging on the T-piece. Generally, Bottom Support systems are applied in boreholes with a static water level of about 60 to 70m. and with a Bottom Support of 20 to 40m.
The Foot Plug and the rope
The first thing to do with the installation is always to attach the rope (#26) to the Foot Plug (#10) that is glued inside the lowest PVC pipe. In the case of a normal “hanging” installation, the foot plug is glued at the bottom of the cylinder screen pipe (#2). When the pipes are attached to the rope, you can easily lower the pipes inside the borehole, and glue one pipe on top of the next.
Important: While you are installing the PVC pipes with the rope, you do not have to wait for 10 minutes until the glue holds 100% because the pipes are held by the rope. This makes installation very easy and fast and can be done by 2 persons. Only in case of a hanging installation, you have to wait 10 minutes before you can let the PVC pipes hanging on the T-piece flange.
Floating Rods (optional)
In deep installations, the rods and total volume of water to lift up with every stroke become quite heavy. Therefore we developed the option of Floating Rods (FR), which is simply a floating double-wall PVC pipe with a smaller diameter than the rising main. These pipes float in the rising main and make pumping some 50% easier. The FR pipes do not touch the inside wall of the rising main and therefore there is no wear and tear; they literally last forever. This option is recommended for installations below 60m but not standard because of the additional cost and needs to be ordered separately.
Floating Bottom Support
When the borehole is quite deep, say for instance 100m, the weight of the PVC pipes that rest on the floor of the borehole can be considerable. To reduce the weight of the Bottom Support pipes, the pipes can be glued together with a special PVC plug (#63) instead of with a glue-socket. Because the air is trapped inside the Bottom Support pipe, these pipes will float in the water of the borehole, with an upward force of about 7 – 8kg per pipe. Directly above the highest plug, a filter intake pipe screen (#1) must be placed to let the water in during pumping. Also, in case you want to take out all the pipes later for whatever reason, the water in the rising main can drain through this screen pipe.
The Bottom Support (BS) installation procedure is basically the same as for the hanging pipes, only the beginning and the end is different. In a nutshell, the following steps are needed:
– Attach the rope (#26) to the sump pipe (1) bottom plug (#10)
– Proceed with adding more PVC pipes
– Glue the conical seat pipe (#3 + #2) at the desired level, 10 m below the static water level
– Add more PVC pipes, until the bottom plug is at bottom of the borehole
– Cut the PVC pipe some 5cm above the baseplate (#29)
– Glue the BS sleeve pipe (#52) with the seal inside (53) inside the T-piece (#6.1)
– Push the T-piece with the sleeve over the pipe in the borehole
– Do NOT glue the pipe in the borehole to the T-piece
– There is now a flexible connection between the T-piece and the rising main (#5)
– Lower the cylinder with the rods inside the rising main
– Cut the rod at the level of the T-piece top (#7)
– Place the steel box (#35) over the T-piece and connect the handle
– Connect the handle to the rods
– Place the rubber absorbers (#39, #55 and #44) on the upper and lower stop pipes
– Start test pumping and check if the water level in the T-piece is stable
– Close the cap (#41) and the BluePump is ready for action.
– After a few days, check all nuts and bolts, re-tighten if needed.
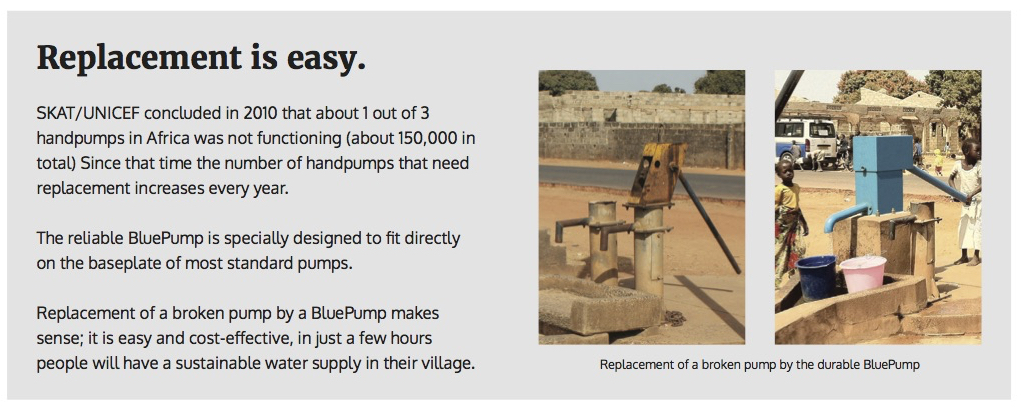
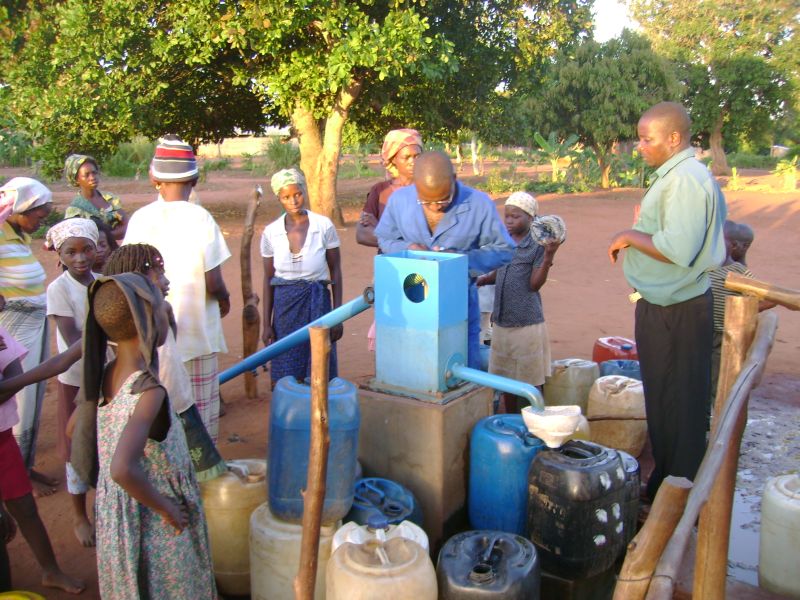
Rehabilitation of abandoned handpumps with the BluePump
In Africa, unfortunately, many handpumps (estimations range from 40 to over 60%) are not functional due to the high repair costs of the many breakdowns. However, the (expensive) borehole is still usable. Therefore it is cost-effective to rehabilitate abandoned handpumps with the durable BluePump, which fits directly on the 4 bolts of the pedestal of old India or Afridev handpump. Rehabilitation is easy and fast.
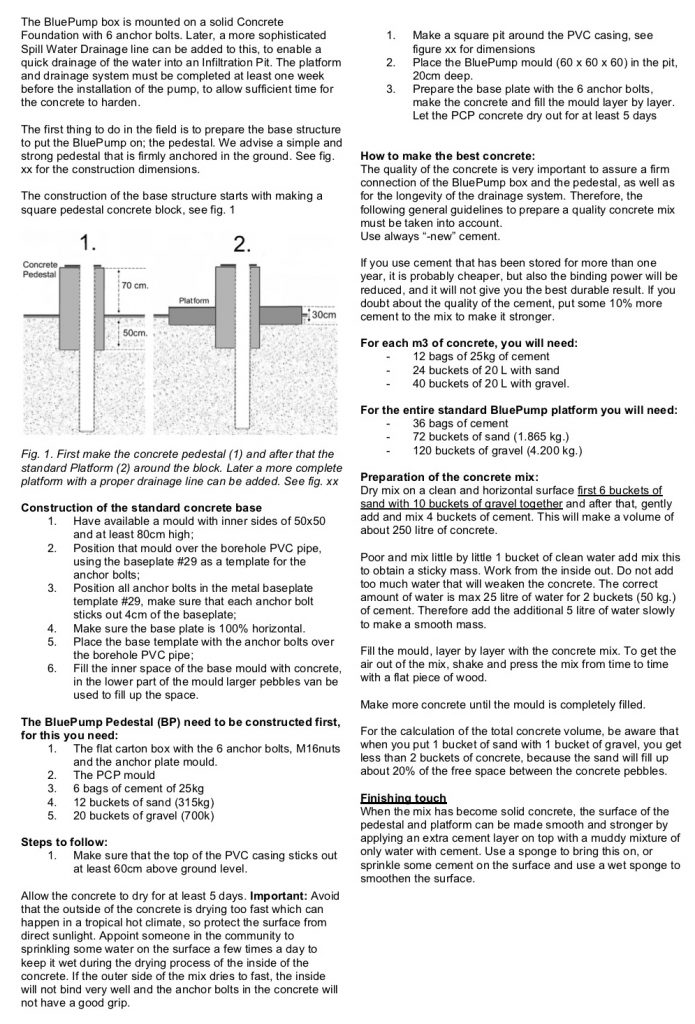
The recomended plinth (50 x 50cm) and height in cm. and anchor bolts positions.